

Table of Contents
Tags
Share
Set up trusted access to your AEM content using SAML 2.0 and certificate-based authentication.
In this guide, you’ll learn how to integrate Okta with AEM using SAML 2.0 and digital certificates. We’ll show you how to set up authentication so that only authorized users in your Okta environment can access protected AEM pages.
Some parts of your AEM site shouldn’t be public. Maybe it’s internal tools, partner content, or anything that only certain users should access. Instead of managing credentials inside AEM, it’s faster—and a whole lot safer—to hand that job off to a trusted identity provider like Okta.
Let us show you how it works—using AEM Core Components and the sample page at at /content/core-components-examples/library.html on a publish instance.
Create Certificates
Before setting up the SAML 2.0 app in Okta, you’ll need to generate RSA public and private keys and a certificate. The private key will be used to sign SAML messages.
Since we’ll be enabling “Assertion Encryption” in Okta, let’s create the keys first.
openssl req -x509 -sha256 -days 365 -newkey rsa:4096 -keyout aem.key -out aem.crt
openssl rsa -in aem.key -outform der -out aem.der
openssl pkcs8 -topk8 -inform der -nocrypt -in aem.der -outform der -out aem-pkcs8.der
Create AEM User
You’ll need a dedicated AEM user to handle authentication. In this example, we’ll create a user named “okta-user”.
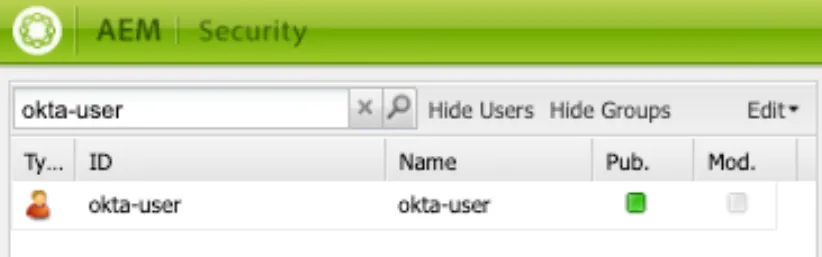
Don’t forget to replicate this user to the publishers.
Create an App in Okta
To keep things simple, we’ll use a trial Okta account.
1. Go to your Okta admin console -> Applications
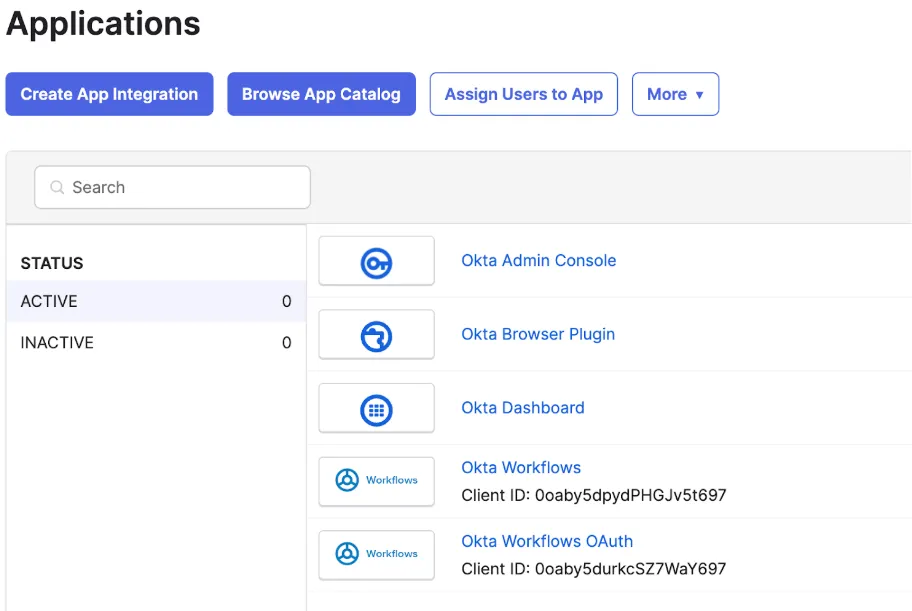
2. Click “Create App Integration” -> Next
3. Select SAML 2.0 -> Next -> Enter App Name, Logo (optional)

4. Create new App -> choose Web and SAML 2.0, App Name: okta-aem-test
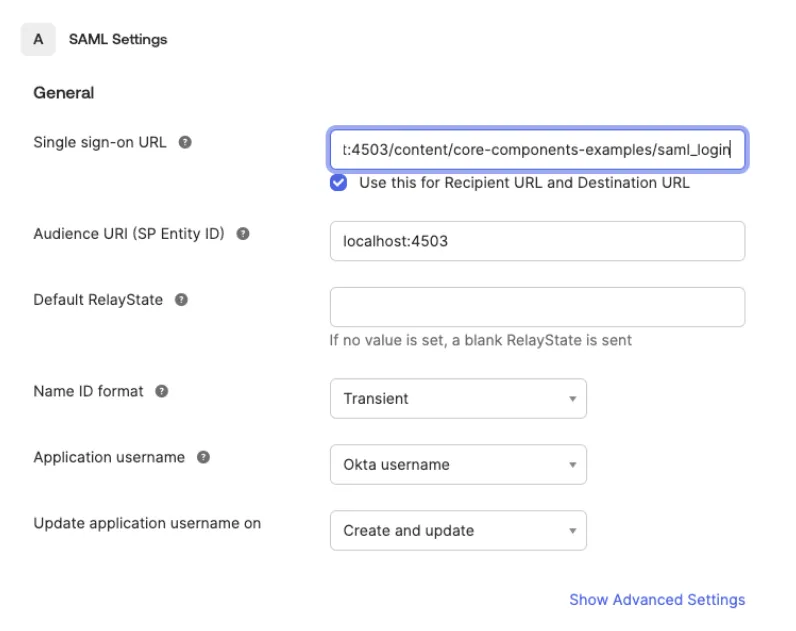
5. General Settings
Single sign-on URL: ttp://localhost:4503/content/core-components-examples/saml_login
Audience URI: localhost:4503
The rest stays unchanged.
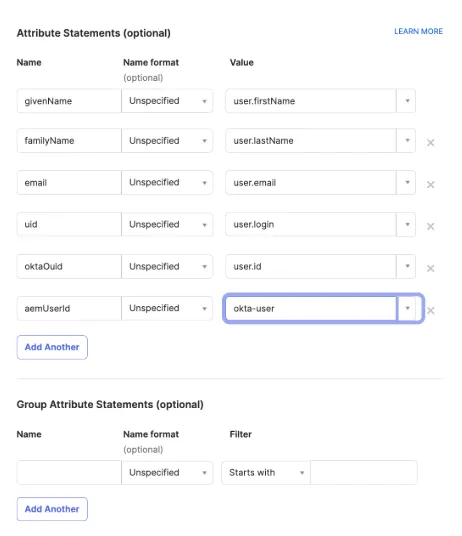
6. Attribute Settings. Here, map the user from Okta to the okta-user we created in AEM earlier.
7. Click Next -> Finish
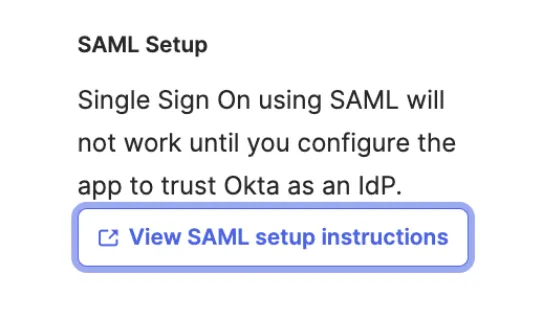
8. On the “Sign On” tab click “View SAML setup instructions”
9. Download certificate here:
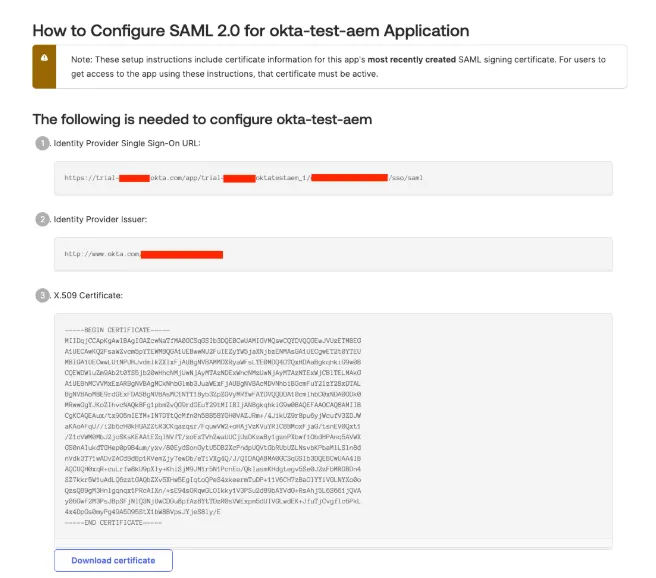
Finally, make sure you have the following ready:
- okta.cert file downloaded
- Identity Provider Single Sign-On URL: (https://trial-*******.okta.com/app/trial-******_oktatestaem_1/******/sso/saml)
- IdP Issuer (http://www.okta.com/****** )
- aem.crt, aem.key, aem.der, aem-pkcs8.der files created earlier
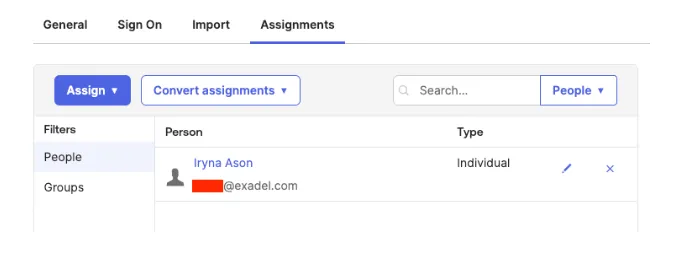
Assign users to the App
Now assign the users or groups who should have access to the AEM content.
Go to the Assignments tab -> Click “Assign to People or Groups” and select users or groups.
Upload certificates to AEM
You can configure this on the author instance and replicate, or set it up directly on the publish instance. For this guide, we’ll use the publish instance.
1. Add okta.cert file to
http://localhost:4503/libs/granite/security/content/truststore.html (or do this on the author instance and and then replicate /etc/truststore/truststore.p12 to all the publishers (write down IP Alias))
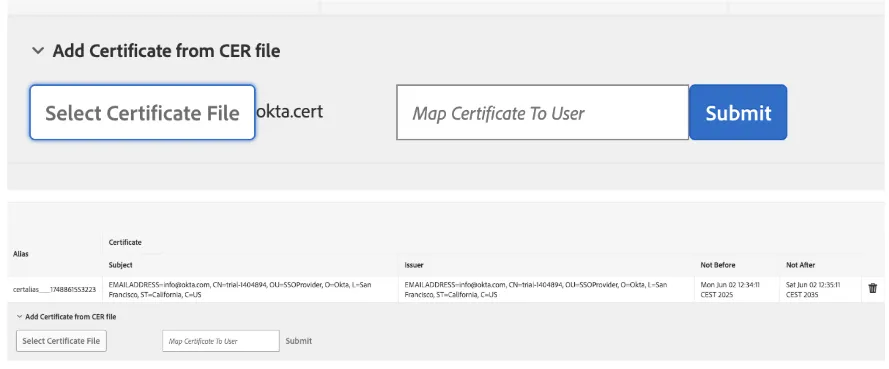
IP Alias = certalias___1748861553223
2. Configure authentication-service user keystore: http://localhost:4503/libs/granite/security/content/v2/usereditor.html/home/users/system/authentication-service (upload files created before, enter SP Alias) (or do this on author and then replicate /home/users/system/authentication-service/keystore/store.p12 to all publish instances)
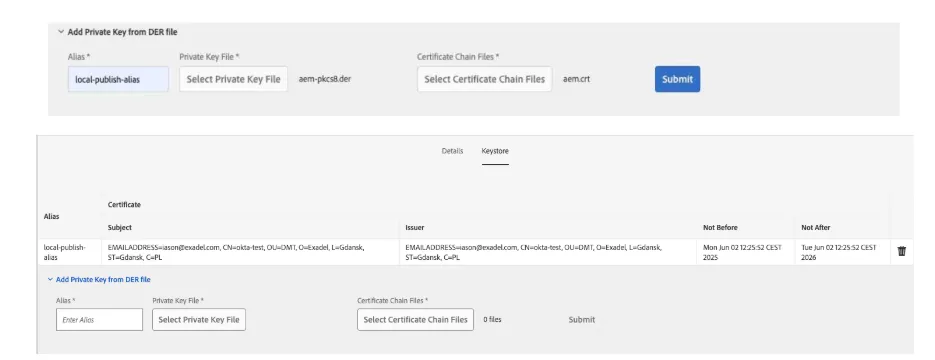
SP Alias = local-publish-alias
Make sure the /etc/truststore and /home/users/system/authentication-service/keystore/ nodes exist (with the same keystore password) before replication
At this point you should have:
- IP Alias: certalias___1748861553223
- SP Alias: local-publish-alias
- Keystore password
Prepare content
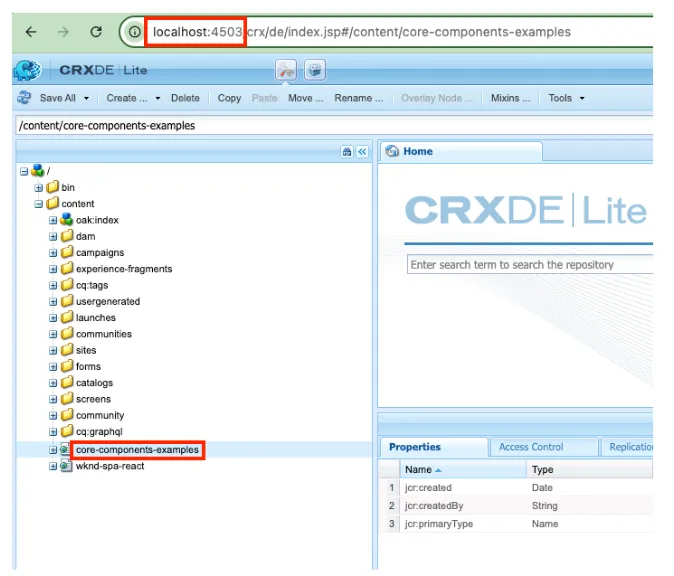
Ensure the /content/core-components-examples/ path is replicated to your publish instance before testing.
Apply OSGI config
It’s time to add the OSGi config files to your project:
/ui.apps/src/main/content/jcr_root/apps/***/config.publish/org.apache.sling.security.impl.ReferrerFilter.xml
<?xml version="1.0" encoding="UTF-8"?>
<jcr:root xmlns:sling="http://sling.apache.org/jcr/sling/1.0" xmlns:jcr="http://www.jcp.org/jcr/1.0"
        jcr:primaryType="sling:OsgiConfig"
        allow.hosts="[trial-1404894-admin.okta.com]"
        filter.methods="[POST,PUT,DELETE]"
        allow.empty="true"
/>
ui.apps/src/main/content/jcr_root/apps/***/config.publish/org.apache.sling.engine.impl.auth.SlingAuthenticator.xml
<?xml version="1.0" encoding="UTF-8"?>
<jcr:root xmlns:sling="http://sling.apache.org/jcr/sling/1.0" xmlns:jcr="http://www.jcp.org/jcr/1.0"
         jcr:primaryType="sling:OsgiConfig"
         auth.sudo.cookie="sling.sudo"
         sling.auth.anonymous.user=""
         sling.auth.anonymous.password=""
         auth.annonymous="true" sling.auth.requirements="[+/libs/granite/oauth/content/authorization,-/content,+/content/core-components-examples/library]"
         osgi.http.whiteboard.listener="true"
         auth.sudo.parameter="sudo"
         auth.http="preemptive"
         auth.uri.suffix="[/j_security_check]"
         auth.http.realm="Sling\ (Development)"
osgi.http.whiteboard.context.select="(osgi.http.whiteboard.context.name\=*)"/>
ui.apps/src/main/content/jcr_root/apps/***/config.publish/org.apache.sling.commons.log.LogManager.factory.config-saml.xml
<?xml version="1.0" encoding="UTF-8"?>
<jcr:root xmlns:sling="http://sling.apache.org/jcr/sling/1.0" xmlns:jcr="http://www.jcp.org/jcr/1.0"
         jcr:primaryType="sling:OsgiConfig"
         org.apache.sling.commons.log.file="logs/saml.log"
         org.apache.sling.commons.log.level="debug"
         org.apache.sling.commons.log.names="[com.adobe.granite.auth.saml]"
         org.apache.sling.commons.log.pattern="\{0,date,dd.MM.yyyy HH:mm:ss.SSS} *{4}* [{2}] {3} {5}"/>
ui.apps/src/main/content/jcr_root/apps/***/config.publish/com.day.crx.security.token.impl.impl.TokenAuthenticationHandler.xml
<?xml version="1.0" encoding="UTF-8"?>
<jcr:root xmlns:sling="http://sling.apache.org/jcr/sling/1.0" xmlns:jcr="http://www.jcp.org/jcr/1.0"
       jcr:primaryType="sling:OsgiConfig"
       skip.token.refresh="[/libs/granite/csrf/token.json,/mnt/overlay/granite/ui/content/shell/header/actions/pulse.data.json]"
       token.alternate.url=""
       path="/"
       token.required.attr="none"
       token.encapsulated="true"/>
ui.apps/src/main/content/jcr_root/apps/***/config.publish/com.adobe.granite.auth.saml.SamlAuthenticationHandler-eb4f0db6-ea88-4905-9e17-0bd22a38feb4.xml
<?xml version="1.0" encoding="UTF-8"?>
<jcr:root xmlns:sling="http://sling.apache.org/jcr/sling/1.0" xmlns:jcr="http://www.jcp.org/jcr/1.0"
         jcr:primaryType="sling:OsgiConfig"
         path="[/content/core-components-examples]"
         createUser="false"
         userIDAttribute="aemUserId"
         serviceProviderEntityId="localhost:4503"
         useEncryption="true"
         spPrivateKeyAlias="local-publish-alias"
         keyStorePassword="***"
         idpUrl="https://trial-***.okta.com/app/trial-***_oktatestaem_1/***/sso/saml"
         synchronizeAttributes="[email\=profile/email,familyName\=profile/familyName,givenName\=profile/givenName]"
         idpCertAlias="certalias___1748861553223"
         identitySyncType="default"
         service.ranking="5002"
         idpHttpRedirect="false"
         defaultRedirectUrl="/"
         idpIdentifier=""
         assertionConsumerServiceURL=""
         defaultGroups="[everyone]"
         signatureMethod="http://www.w3.org/2001/04/xmldsig-more#rsa-sha256"
         addGroupMemberships="true"
         digestMethod="http://www.w3.org/2001/04/xmlenc#sha256"
         clockTolerance="60"
         groupMembershipAttribute=""
         logoutUrl=""
         handleLogout="false"
         userIntermediatePath=""
         nameIdFormat="urn:oasis:names:tc:SAML:2.0:nameid-format:transient"/>
Testing
That’s it! You’re ready to test.
Now open “http://localhost:4503/content/core-components-examples/library.html”. You should be redirected to Okta automatically:
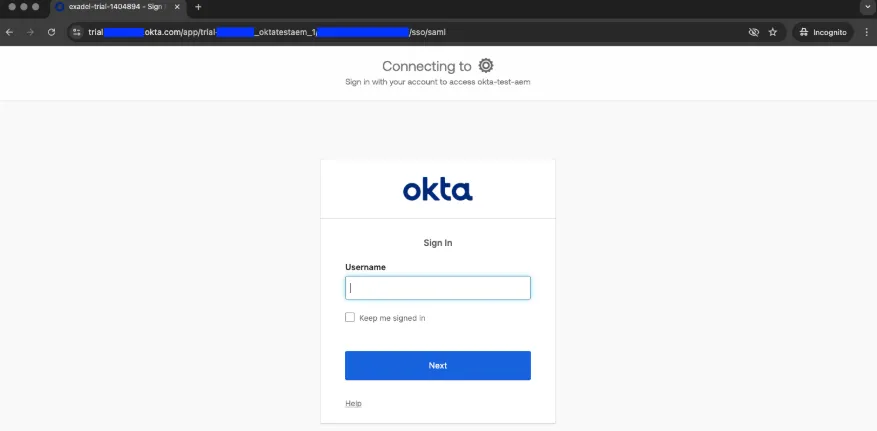
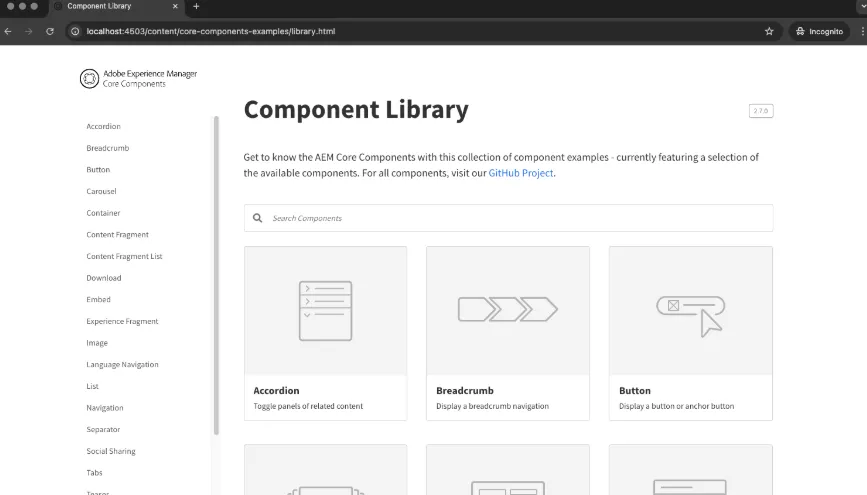
After entering your username, password and security code, you’ll see the following page:
Important notice
If you’re getting a “java.security.InvalidKeyException: Illegal key size” exception, you’re likely using a version of Java that doesn’t support strong encryption by default.
To resolve this:
- Use Java 9 or higher, or
- Install the Java Cryptography Extension (JCE) Unlimited Strength Jurisdiction Policy Files (available from Oracle).
For more info, see: InvalidKeyException Illegal key size – java
Further Steps
This setup covers Okta integration on a publish instance only. It doesn’t yet account for Dispatcher configuration.
To allow SAML login requests through Dispatcher, you’ll need to allow POST requests to /saml_login.
In your filter config, add:
dispatcher/src/conf.dispatcher.d/filters/filters.any:
/0100 { /type "allow" /method "POST" /url "*/saml_login" }
Author: Exadel Digital Experience Team
Set up trusted access to your AEM content using SAML 2.0 and certificate-based authentication.
Some parts of your AEM site shouldn’t be public. Maybe it’s internal tools, partner content, or anything that only certain users should access. Instead of managing credentials inside AEM, it’s faster—and a whole lot safer—to hand that job off to a trusted identity provider like Okta.
In this guide, you’ll learn how to integrate Okta with AEM using SAML 2.0 and digital certificates. We’ll show you how to set up authentication so that only authorized users in your Okta environment can access protected AEM pages.
Let us show you how it works—using AEM Core Components and the sample page at at /content/core-components-examples/library.html on a publish instance.
Create Certificates
Before setting up the SAML 2.0 app in Okta, you’ll need to generate RSA public and private keys and a certificate. The private key will be used to sign SAML messages.
Since we’ll be enabling “Assertion Encryption” in Okta, let’s create the keys first.
openssl req -x509 -sha256 -days 365 -newkey rsa:4096 -keyout aem.key -out aem.crt
openssl rsa -in aem.key -outform der -out aem.der
openssl pkcs8 -topk8 -inform der -nocrypt -in aem.der -outform der -out aem-pkcs8.der
Create AEM User
You’ll need a dedicated AEM user to handle authentication. In this example, we’ll create a user named “okta-user”.
Don’t forget to replicate this user to the publishers.
Create an App in Okta
To keep things simple, we’ll use a trial Okta account.
1. Go to your Okta admin console -> Applications
2. Click “Create App Integration” -> Next
3. Select SAML 2.0 -> Next -> Enter App Name, Logo (optional)
4. Create new App -> choose Web and SAML 2.0, App Name: okta-aem-test
5. General Settings
Single sign-on URL: ttp://localhost:4503/content/core-components-examples/saml_login
Audience URI: localhost:4503
The rest stays unchanged.
6. Attribute Settings. Here, map the user from Okta to the okta-user we created in AEM earlier.
7. Click Next -> Finish
8. On the “Sign On” tab click “View SAML setup instructions”
9. Download certificate here:
Finally, make sure you have the following ready:
- okta.cert file downloaded
- Identity Provider Single Sign-On URL: (https://trial-*******.okta.com/app/trial-******_oktatestaem_1/******/sso/saml)
- IdP Issuer (http://www.okta.com/****** )
- aem.crt, aem.key, aem.der, aem-pkcs8.der files created earlier
Assign users to the App
Now assign the users or groups who should have access to the AEM content.
Go to the Assignments tab -> Click “Assign to People or Groups” and select users or groups.
Upload certificates to AEM
You can configure this on the author instance and replicate, or set it up directly on the publish instance. For this guide, we’ll use the publish instance.
1. Add okta.cert file to
http://localhost:4503/libs/granite/security/content/truststore.html (or do this on the author instance and and then replicate /etc/truststore/truststore.p12 to all the publishers (write down IP Alias))
IP Alias = certalias___1748861553223
2. Configure authentication-service user keystore: http://localhost:4503/libs/granite/security/content/v2/usereditor.html/home/users/system/authentication-service (upload files created before, enter SP Alias) (or do this on author and then replicate /home/users/system/authentication-service/keystore/store.p12 to all publish instances)
SP Alias = local-publish-alias
Make sure the /etc/truststore and /home/users/system/authentication-service/keystore/ nodes exist (with the same keystore password) before replication
At this point you should have:
- IP Alias: certalias___1748861553223
- SP Alias: local-publish-alias
- Keystore password
Prepare content
Ensure the /content/core-components-examples/ path is replicated to your publish instance before testing.
Apply OSGI config
It’s time to add the OSGi config files to your project:
/ui.apps/src/main/content/jcr_root/apps/***/config.publish/org.apache.sling.security.impl.ReferrerFilter.xml
<?xml version="1.0" encoding="UTF-8"?>
<jcr:root xmlns:sling="http://sling.apache.org/jcr/sling/1.0" xmlns:jcr="http://www.jcp.org/jcr/1.0"
        jcr:primaryType="sling:OsgiConfig"
        allow.hosts="[trial-1404894-admin.okta.com]"
        filter.methods="[POST,PUT,DELETE]"
        allow.empty="true"
/>
ui.apps/src/main/content/jcr_root/apps/***/config.publish/org.apache.sling.engine.impl.auth.SlingAuthenticator.xml
<?xml version="1.0" encoding="UTF-8"?>
<jcr:root xmlns:sling="http://sling.apache.org/jcr/sling/1.0" xmlns:jcr="http://www.jcp.org/jcr/1.0"
         jcr:primaryType="sling:OsgiConfig"
         auth.sudo.cookie="sling.sudo"
         sling.auth.anonymous.user=""
         sling.auth.anonymous.password=""
         auth.annonymous="true" sling.auth.requirements="[+/libs/granite/oauth/content/authorization,-/content,+/content/core-components-examples/library]"
         osgi.http.whiteboard.listener="true"
         auth.sudo.parameter="sudo"
         auth.http="preemptive"
         auth.uri.suffix="[/j_security_check]"
         auth.http.realm="Sling\ (Development)"
osgi.http.whiteboard.context.select="(osgi.http.whiteboard.context.name\=*)"/>
ui.apps/src/main/content/jcr_root/apps/***/config.publish/org.apache.sling.commons.log.LogManager.factory.config-saml.xml
<?xml version="1.0" encoding="UTF-8"?>
<jcr:root xmlns:sling="http://sling.apache.org/jcr/sling/1.0" xmlns:jcr="http://www.jcp.org/jcr/1.0"
         jcr:primaryType="sling:OsgiConfig"
         org.apache.sling.commons.log.file="logs/saml.log"
         org.apache.sling.commons.log.level="debug"
         org.apache.sling.commons.log.names="[com.adobe.granite.auth.saml]"
         org.apache.sling.commons.log.pattern="\{0,date,dd.MM.yyyy HH:mm:ss.SSS} *{4}* [{2}] {3} {5}"/>
ui.apps/src/main/content/jcr_root/apps/***/config.publish/com.day.crx.security.token.impl.impl.TokenAuthenticationHandler.xml
<?xml version="1.0" encoding="UTF-8"?>
<jcr:root xmlns:sling="http://sling.apache.org/jcr/sling/1.0" xmlns:jcr="http://www.jcp.org/jcr/1.0"
       jcr:primaryType="sling:OsgiConfig"
       skip.token.refresh="[/libs/granite/csrf/token.json,/mnt/overlay/granite/ui/content/shell/header/actions/pulse.data.json]"
       token.alternate.url=""
       path="/"
       token.required.attr="none"
       token.encapsulated="true"/>
ui.apps/src/main/content/jcr_root/apps/***/config.publish/com.adobe.granite.auth.saml.SamlAuthenticationHandler-eb4f0db6-ea88-4905-9e17-0bd22a38feb4.xml
<?xml version="1.0" encoding="UTF-8"?>
<jcr:root xmlns:sling="http://sling.apache.org/jcr/sling/1.0" xmlns:jcr="http://www.jcp.org/jcr/1.0"
         jcr:primaryType="sling:OsgiConfig"
         path="[/content/core-components-examples]"
         createUser="false"
         userIDAttribute="aemUserId"
         serviceProviderEntityId="localhost:4503"
         useEncryption="true"
         spPrivateKeyAlias="local-publish-alias"
         keyStorePassword="***"
         idpUrl="https://trial-***.okta.com/app/trial-***_oktatestaem_1/***/sso/saml"
         synchronizeAttributes="[email\=profile/email,familyName\=profile/familyName,givenName\=profile/givenName]"
         idpCertAlias="certalias___1748861553223"
         identitySyncType="default"
         service.ranking="5002"
         idpHttpRedirect="false"
         defaultRedirectUrl="/"
         idpIdentifier=""
         assertionConsumerServiceURL=""
         defaultGroups="[everyone]"
         signatureMethod="http://www.w3.org/2001/04/xmldsig-more#rsa-sha256"
         addGroupMemberships="true"
         digestMethod="http://www.w3.org/2001/04/xmlenc#sha256"
         clockTolerance="60"
         groupMembershipAttribute=""
         logoutUrl=""
         handleLogout="false"
         userIntermediatePath=""
         nameIdFormat="urn:oasis:names:tc:SAML:2.0:nameid-format:transient"/>
Testing
That’s it! You’re ready to test.
Now open “http://localhost:4503/content/core-components-examples/library.html”. You should be redirected to Okta automatically:
After entering your username, password and security code, you’ll see the following page:
Important notice
If you’re getting a “java.security.InvalidKeyException: Illegal key size” exception, you’re likely using a version of Java that doesn’t support strong encryption by default.
To resolve this:
- Use Java 9 or higher, or
- Install the Java Cryptography Extension (JCE) Unlimited Strength Jurisdiction Policy Files (available from Oracle).
For more info, see: InvalidKeyException Illegal key size – java
Further Steps
This setup covers Okta integration on a publish instance only. It doesn’t yet account for Dispatcher configuration.
To allow SAML login requests through Dispatcher, you’ll need to allow POST requests to /saml_login.
In your filter config, add:
dispatcher/src/conf.dispatcher.d/filters/filters.any:
/0100 { /type "allow" /method "POST" /url "*/saml_login" }
Author: Exadel Digital Experience Team
.png)